
0. 前言
因應行政部門關鍵民生系統韌性(關鍵民生系統精進雲端備份及回復計畫),以下為Tahoe-LAFS的安裝步驟。
1. 準備三台安裝好Ubuntu 22.04 的虛擬機或實體機
這邊以三台VM演示,使用的規格為 4 vCPU, 4GB RAM, Storage: 100G。
2. 更新套件清單與升級套件
更新完後請重啟作業系統,本文指令接需使用root身分執行。
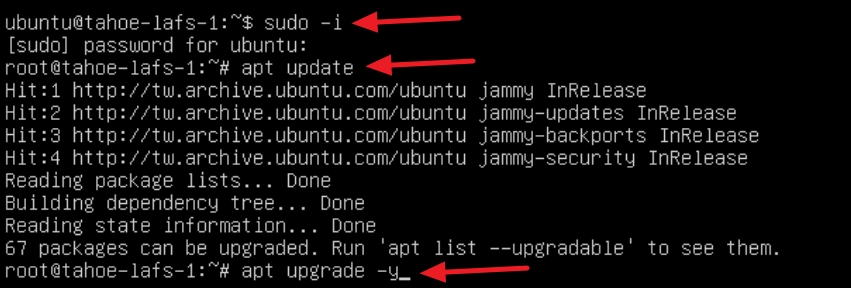
sudo -i
apt update
apt upgrade -y
reboot
3. 安裝Python與其他套件


sudo -i
apt install python3-pip python3-dev libffi-dev libssl-dev -y
4. 安裝 pyopenssl

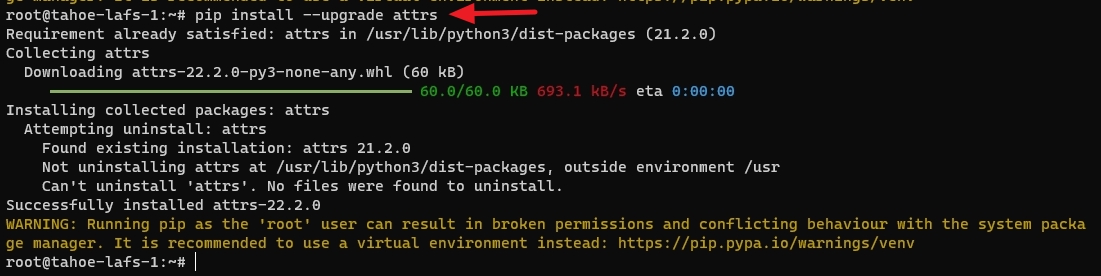
pip install pyopenssl5. 升級 attrs
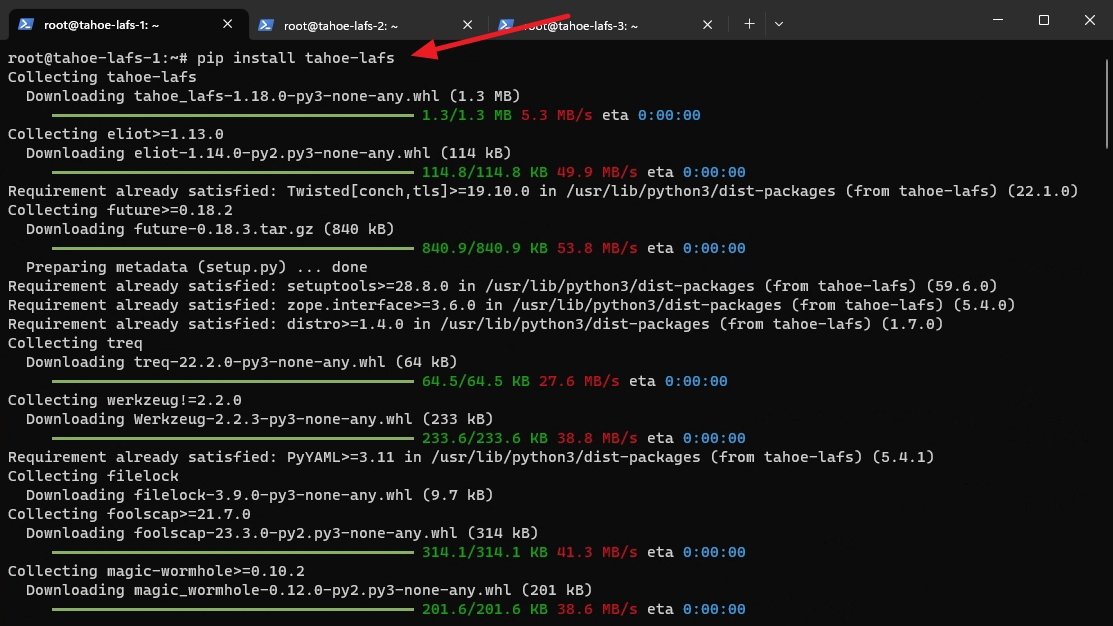
pip install --upgrade attrs6. 安裝 tahoe-lafs
pip install tahoe-lafs7. 檢查Ubuntu、Python、Tahoe-LAFS版本
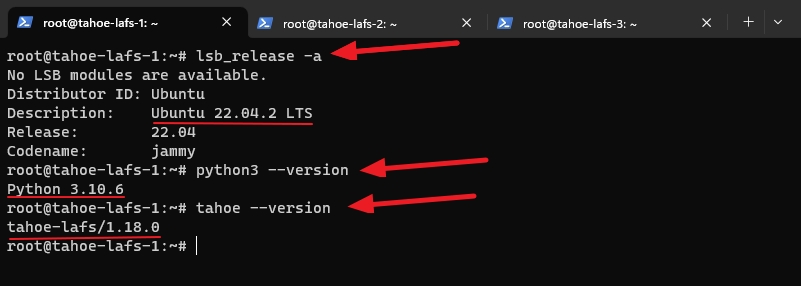
lsb_release -a
python3 --version
tahoe --version
8. 編輯hosts
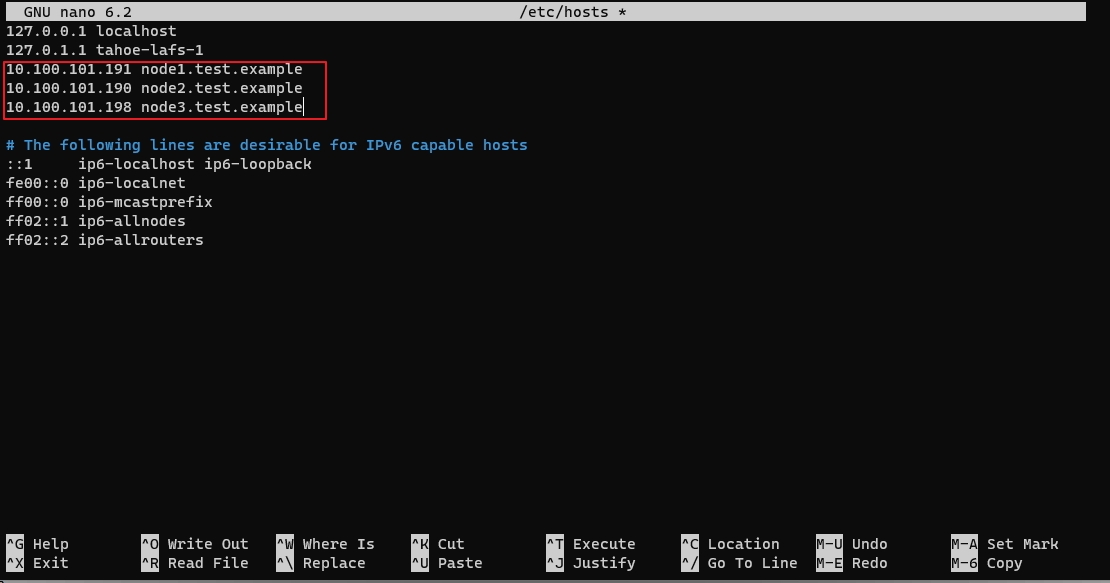
nano /etc/hosts
10.100.101.191 node1.test.example
10.100.101.190 node2.test.example
10.100.101.189 node3.test.example
9. 在第一個節點建立介紹者(introducer)
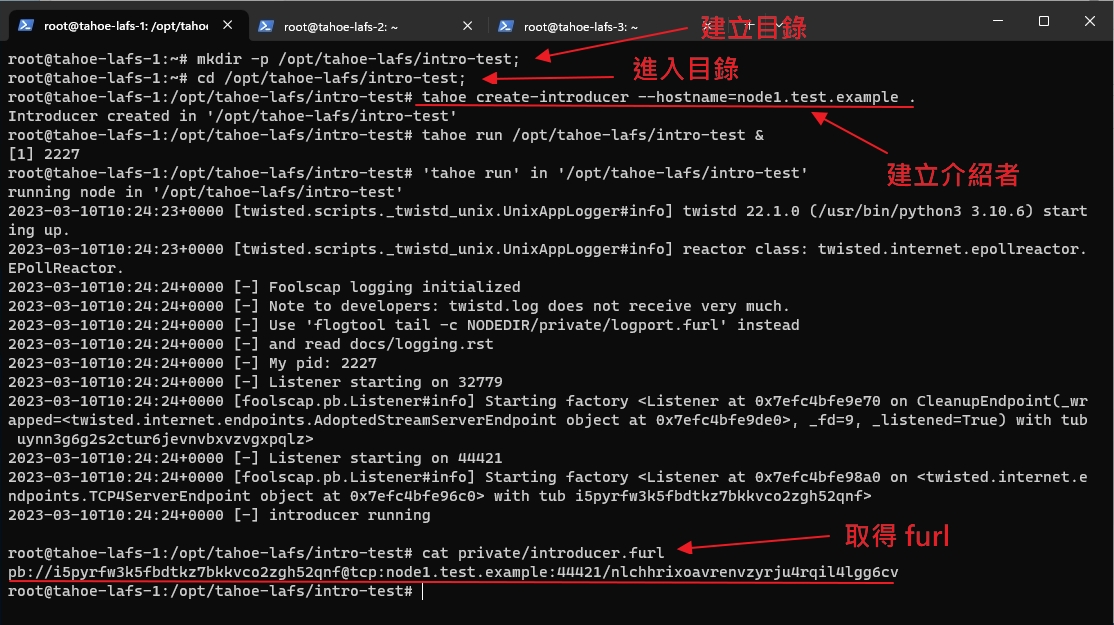
#建立目錄
mkdir -p /opt/tahoe-lafs/intro-test;

#進入目錄
cd /opt/tahoe-lafs/intro-test;

#建立介紹者
tahoe create-introducer --hostname=server1-domain .

tahoe create-introducer --hostname=node1.test.example .

#運行介紹者
tahoe run /opt/tahoe-lafs/intro-test &

#查看furl
cat private/introducer.furl
cat private/introducer.furl 之後會出現 pb 連結,這個要記好,後面步驟會用到。
pb://i5pyrfw3k5fbdtkz7bkkvco2zgh52qnf@tcp:node1.test.example:44421/nlchhrixoavrenvzyrju4rqil4lgg6cv
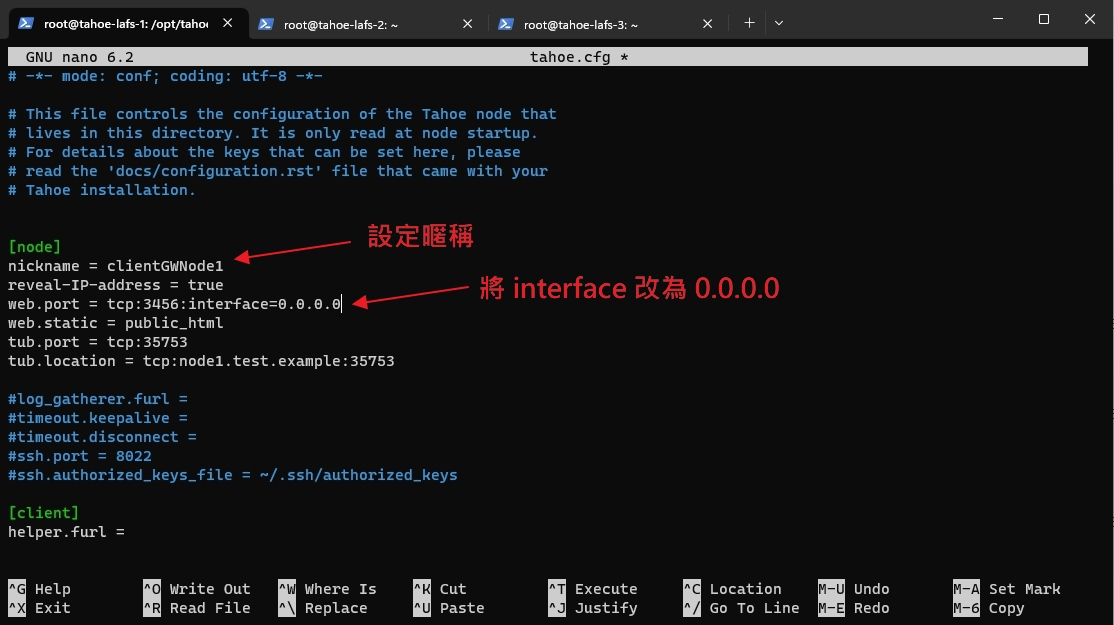
10. 在第一個節點建立Client Web(Gateway)
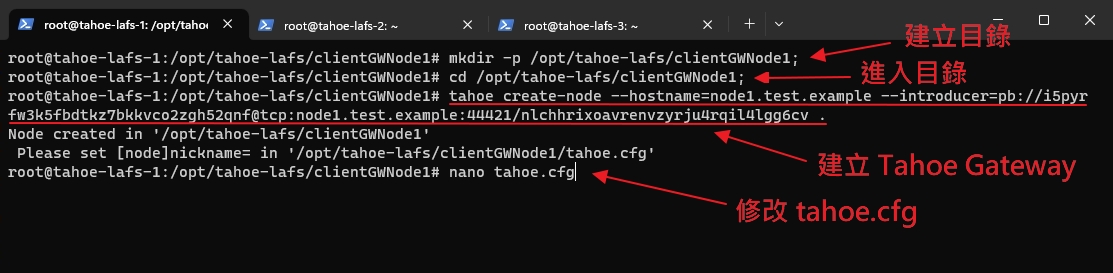
#建立目錄
mkdir -p /opt/tahoe-lafs/clientGWNode1;
#進入目錄
cd /opt/tahoe-lafs/clientGWNode1;
#建立 Gateway 節點
tahoe create-node --hostname=自訂HostName --introducer=取得的PD連捷 .
tahoe create-node --hostname=node1.test.example --introducer=pb://i5pyrfw3k5fbdtkz7bkkvco2zgh52qnf@tcp:node1.test.example:44421/nlchhrixoavrenvzyrju4rqil4lgg6cv .
#編輯 tahoe.cfg
nano tahoe.cfg
#新增暱稱
nickname = clientGWNode1
#將 interface 修改為 0.0.0.0
web.port = tcp:3456:interface=0.0.0.0
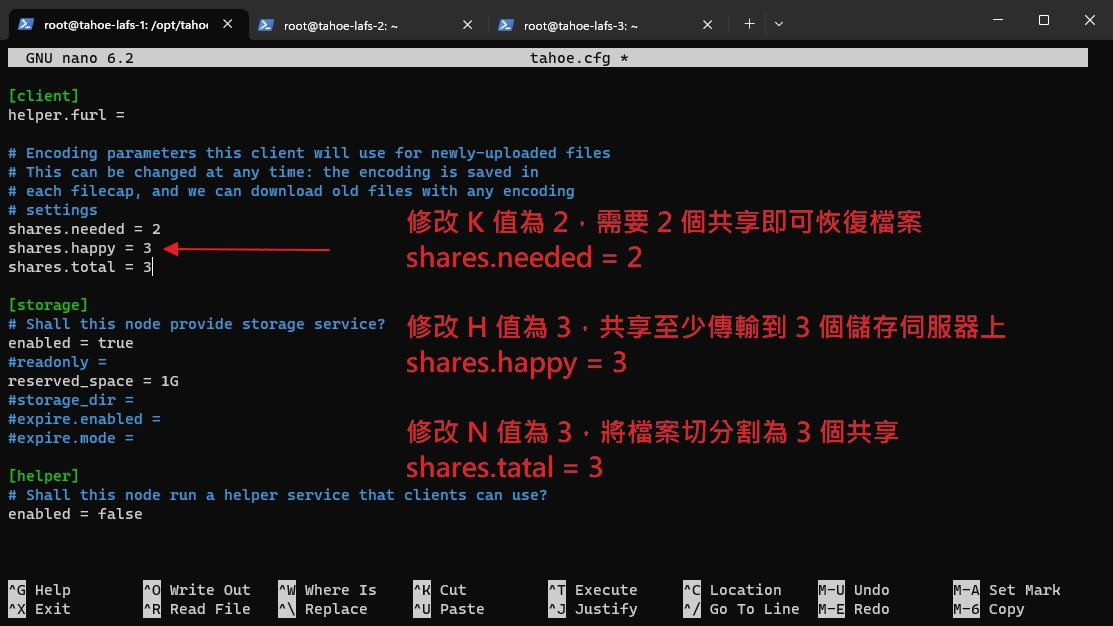
#修改共享參數
shares.needed = 2
shares.happy = 3
shares.total = 311. 在第二台伺服器建立儲存節點 (Storage)
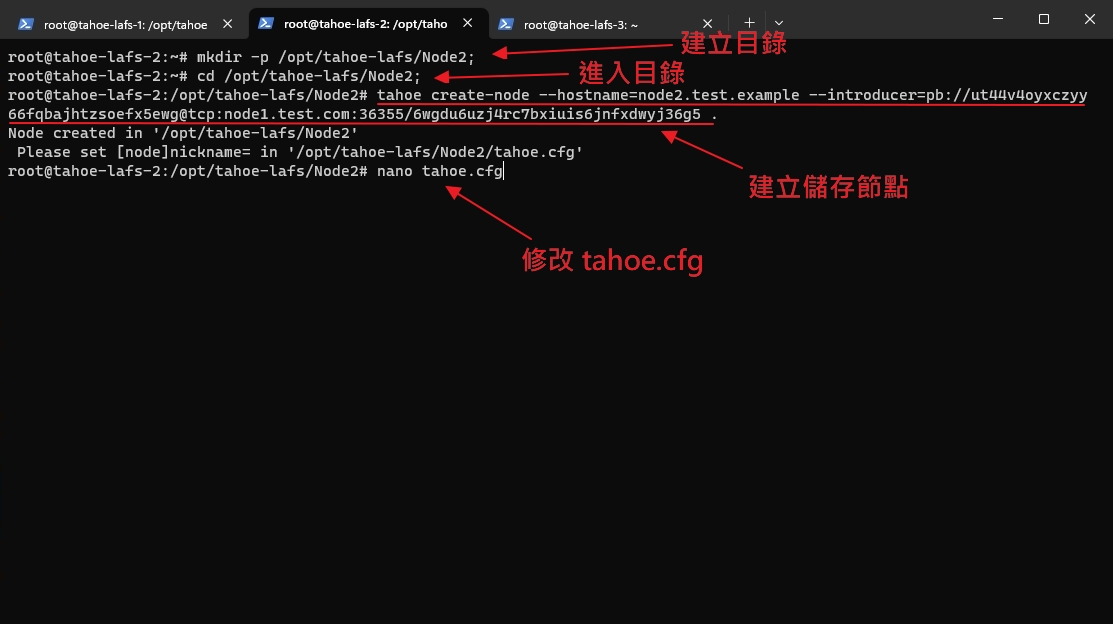
#建立目錄
mkdir -p /opt/tahoe-lafs/Node2;
#進入目錄
cd /opt/tahoe-lafs/Node2;
#建立儲存節點
tahoe create-node --hostname=自訂HostName --introducer=取得的PD連捷 .
tahoe create-node --hostname=node2.test.example --introducer=pb://i5pyrfw3k5fbdtkz7bkkvco2zgh52qnf@tcp:node1.test.example:44421/nlchhrixoavrenvzyrju4rqil4lgg6cv .
#編輯 tahoe.cfg
nano tahoe.cfg
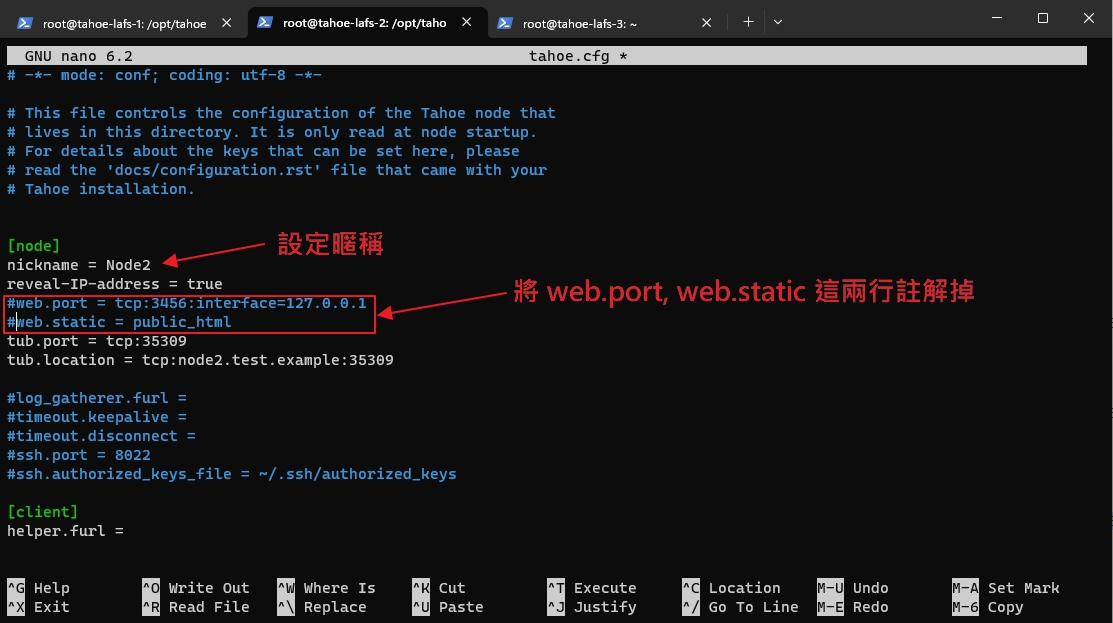
#新增暱稱
nickname = Node2
#將這兩行註解掉
#web.port = tcp:3456:interface=127.0.0.1
#web.static = public_html12. 在第三台伺服器建立儲存節點 (Storage)
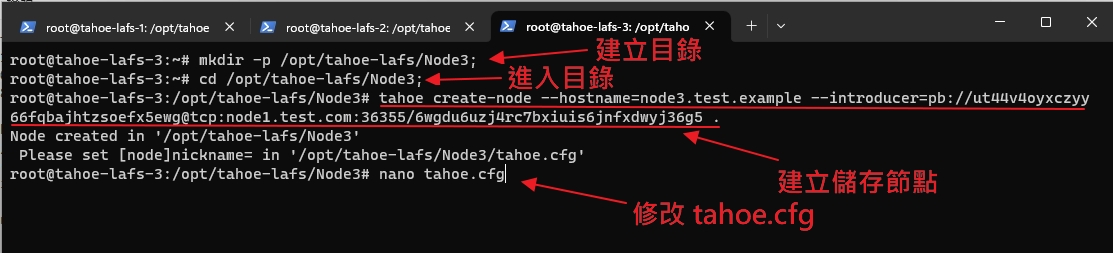
#建立目錄
mkdir -p /opt/tahoe-lafs/Node3;
#進入目錄
cd /opt/tahoe-lafs/Node3;
#建立儲存節點
tahoe create-node --hostname=自訂HostName --introducer=取得的PD連捷 .
tahoe create-node --hostname=node3.test.example --introducer=pb://i5pyrfw3k5fbdtkz7bkkvco2zgh52qnf@tcp:node1.test.example:44421/nlchhrixoavrenvzyrju4rqil4lgg6cv .
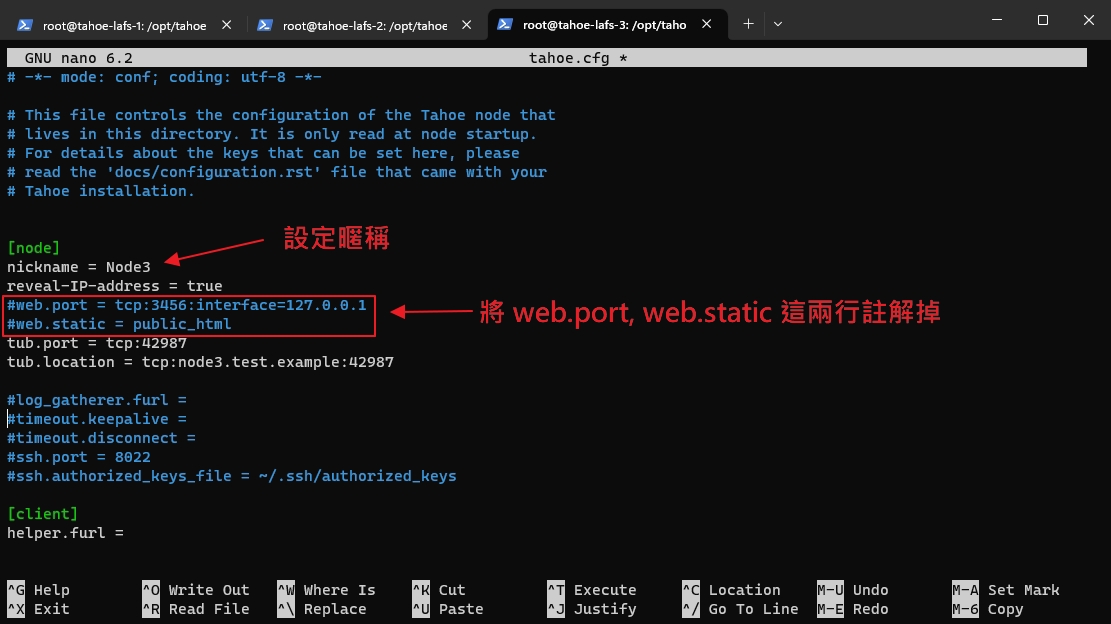
#編輯 tahoe.cfg
nano tahoe.cfg
#新增暱稱
nickname = Node3
#將這兩行註解掉
#web.port = tcp:3456:interface=127.0.0.1
#web.static = public_html13. 啟動第一台伺服器上的 Gateway 並建立起始文件目錄 (rootcap)
#建立資料夾用來儲存 alias.tmp
mkdir -p /root/.tahoe/private/
#啟動第一台伺服器上的 Gateway
tahoe run /opt/tahoe-lafs/clientGWNode1 &
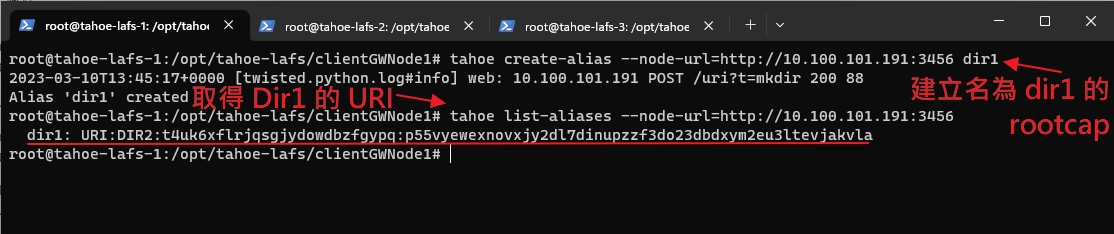
#建立名為"dir1"的起始文件目錄 (rootcap)
tahoe create-alias --node-url=http://node1-ip:3456 自訂DirName
tahoe create-alias --node-url=http://10.100.101.191:3456 dir1
#取得所有目錄的 DRI
tahoe list-aliases --node-url=http://node1-ip:3456
tahoe list-aliases --node-url=http://10.100.101.191:3456
#URI格式如下
dir1: URI:DIR2:t4uk6xflrjqsgjydowdbzfgypq:p55vyewexnovxjy2dl7dinupzzf3do23dbdxym2eu3ltevjakvla14. 啟動第二台、第三台上的儲存節點
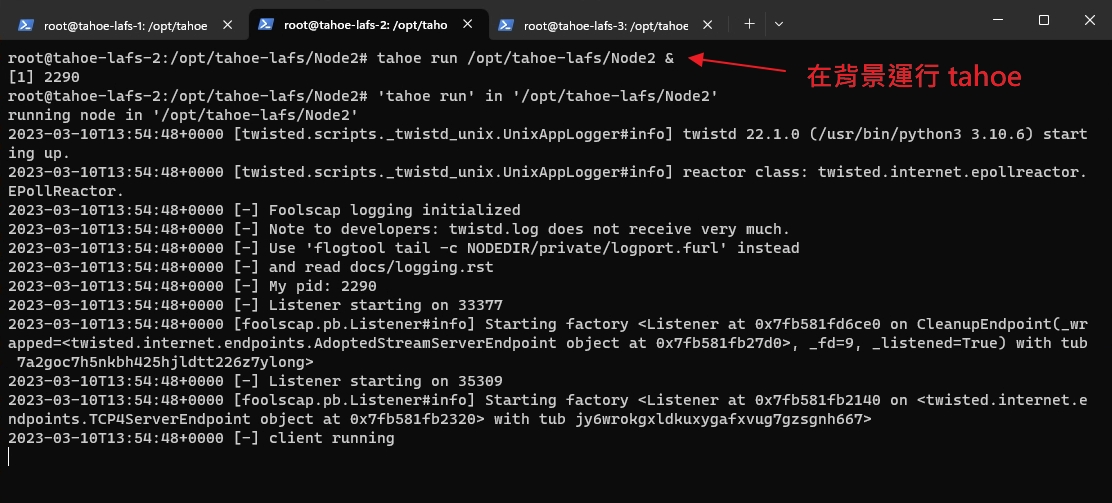
#啟動第二台伺服器上的儲存節點 (需在第二台下指令)
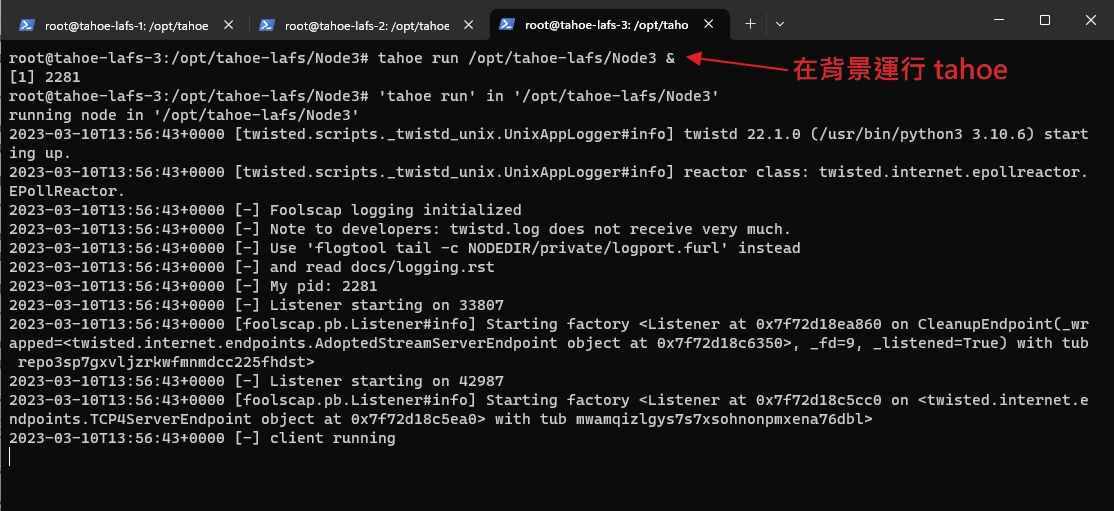
tahoe run /opt/tahoe-lafs/Node2 &
#啟動第三台伺服器上的儲存節點 (需在第三台下指令)
tahoe run /opt/tahoe-lafs/Node3 &15. 打開網頁即可使用
#瀏覽器開啟
http://server1-ip:3456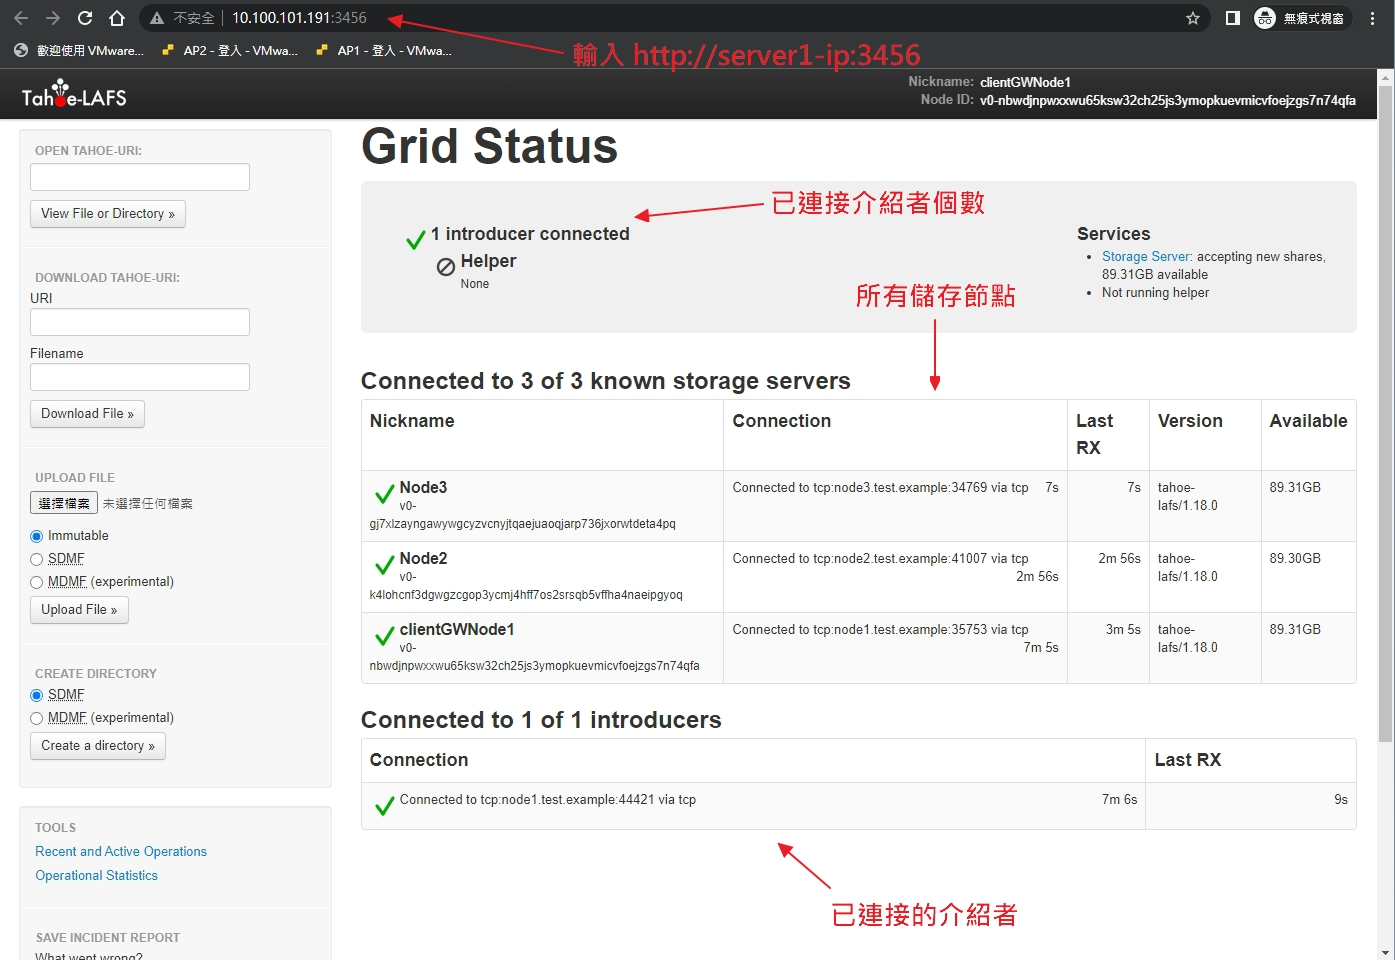
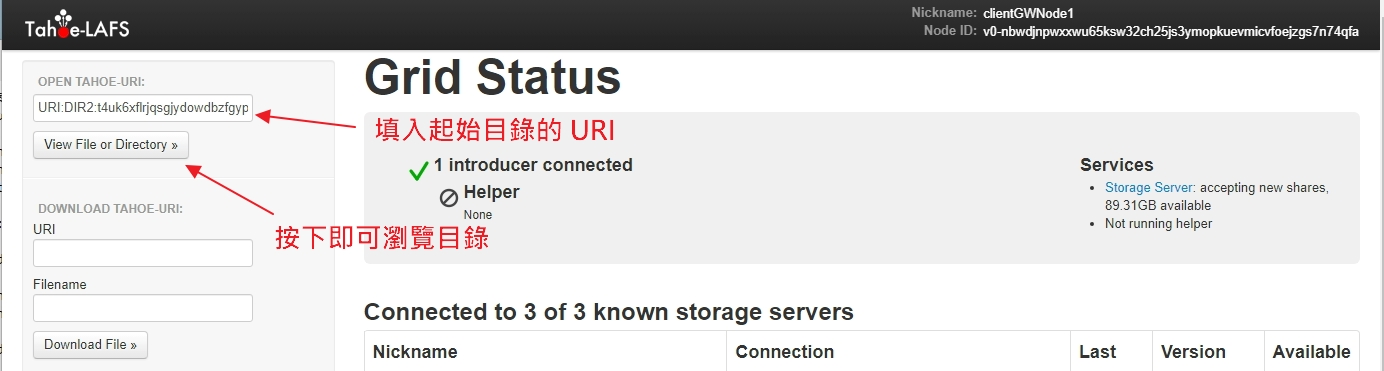
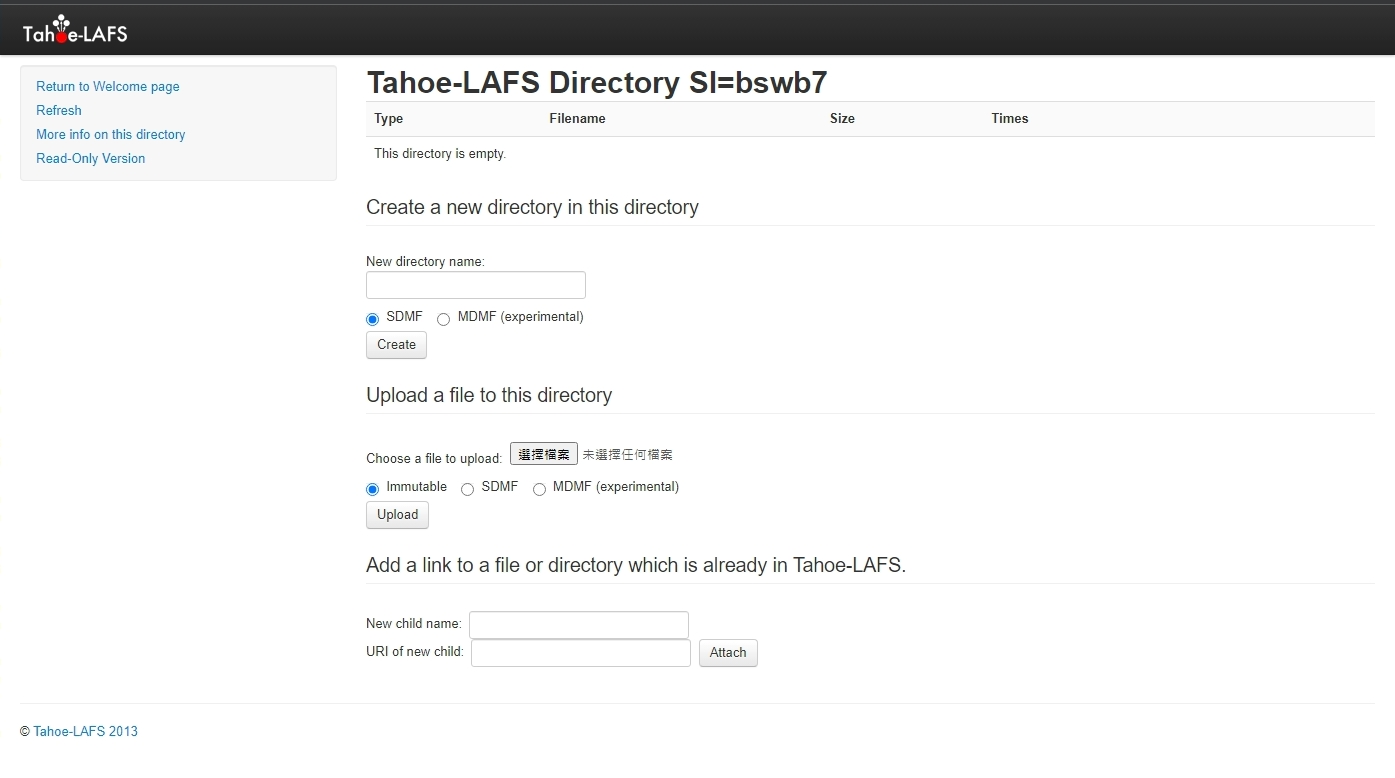
16. 瀏覽起始文件目錄 (rootcap)
將前面取得的URI填入後按下 “View File or Directory »”,即可瀏覽目錄。
dir1:URI:DIR2:t4uk6xflrjqsgjydowdbzfgypq:p55vyewexnovxjy2dl7dinupzzf3do23dbdxym2eu3ltevjakvla
17. 中斷執行第一台伺服器上的 Gateway

#列出所有後台執行的工作
jobs

#fg num 將後台執行的叫回前台
fg 2

# Ctrl + C 停止程式執行
Ctrl + C
18. 產生 SSH 公鑰、私鑰
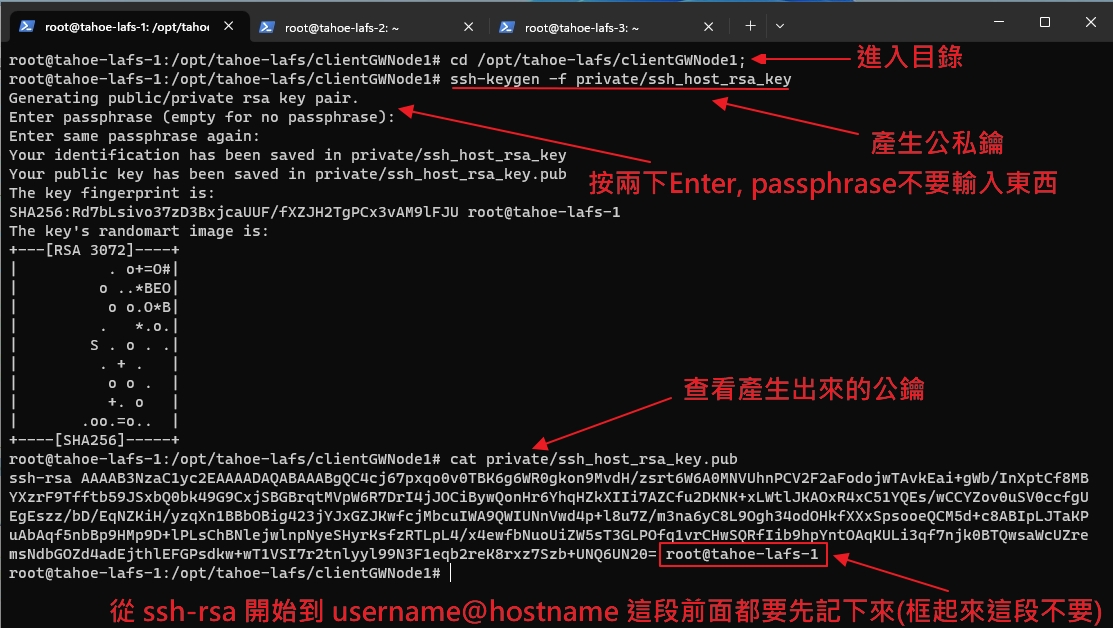
#進入目錄
cd /opt/tahoe-lafs/clientGWNode1;

#產生公鑰、私鑰 (出現要輸入passphare時,直接按Enter。)
ssh-keygen -f private/ssh_host_rsa_key

#查看產生出來的公鑰
cat private/ssh_host_rsa_key.pub

#先記下 ssh-ras 開始到 username@hostname 這段前面
ssh-rsa AAAAB3NzaC1yc2EAAAADAQABAAABgQC4cj67pxqo0v0TBK6g6WR0gkon9MvdH/zsrt6W6A0MNVUhnPCV2F2aFodojwTAvkEai+gWb/InXptCf8MBYXzrF9Tfftb59JSxbQ0bk49G9CxjSBGBrqtMVpW6R7DrI4jJOCiBywQonHr6YhqHZkXIIi7AZCfu2DKNK+xLWtlJKAOxR4xC51YQEs/wCCYZov0uSV0ccfgUEgEszz/bD/EqNZKiH/yzqXn1BBbOBig423jYJxGZJKwfcjMbcuIWA9QWIUNnVwd4p+l8u7Z/m3na6yC8L9Ogh34odOHkfXXxSpsooeQCM5d+c8ABIpLJTaKPuAbAqf5nbBp9HMp9D+lPLsChBNlejwlnpNyeSHyrKsfzRTLpL4/x4ewfbNuoUiZW5sT3GLPOfq1vrCHwSQRfIib9hpYntOAqKULi3qf7njk0BTQwsaWcUZremsNdbGOZd4adEjthlEFGPsdkw+wT1VSI7r2tnlyyl99N3F1eqb2reK8rxz7Szb+UNQ6UN20=

#複製一份私鑰到根目錄下
cp /opt/tahoe-lafs/clientGWNode1/private/ssh_host_rsa_key /ssh_host_rsa_key

#修改權限,讓非root用戶也可以讀取
chmod 775 /ssh_host_rsa_key
19. 新增 Tahoe-LAFS SFTP 帳號

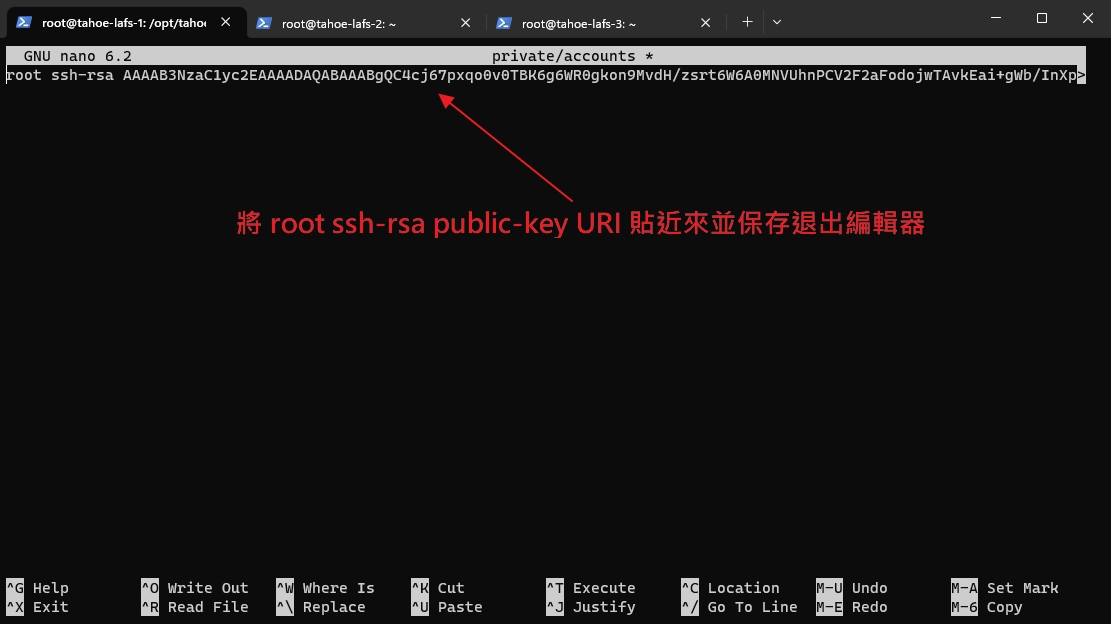
#編輯帳號
nano private/accounts

#SFTP 帳號格式
username ssh-rsa public-key 之前取得的URI

#新增一行
root ssh-rsa AAAAB3NzaC1yc2EAAAADAQABAAABgQC4cj67pxqo0v0TBK6g6WR0gkon9MvdH/zsrt6W6A0MNVUhnPCV2F2aFodojwTAvkEai+gWb/InXptCf8MBYXzrF9Tfftb59JSxbQ0bk49G9CxjSBGBrqtMVpW6R7DrI4jJOCiBywQonHr6YhqHZkXIIi7AZCfu2DKNK+xLWtlJKAOxR4xC51YQEs/wCCYZov0uSV0ccfgUEgEszz/bD/EqNZKiH/yzqXn1BBbOBig423jYJxGZJKwfcjMbcuIWA9QWIUNnVwd4p+l8u7Z/m3na6yC8L9Ogh34odOHkfXXxSpsooeQCM5d+c8ABIpLJTaKPuAbAqf5nbBp9HMp9D+lPLsChBNlejwlnpNyeSHyrKsfzRTLpL4/x4ewfbNuoUiZW5sT3GLPOfq1vrCHwSQRfIib9hpYntOAqKULi3qf7njk0BTQwsaWcUZremsNdbGOZd4adEjthlEFGPsdkw+wT1VSI7r2tnlyyl99N3F1eqb2reK8rxz7Szb+UNQ6UN20= URI:DIR2:2utf3uohyx6hx557yr77cjlalm:s5nn5cit3j5vlkyxeg3pwt6tiaal2z4zcuow43sqvxso6fau3yua
20. 修改 tahoe.cfg

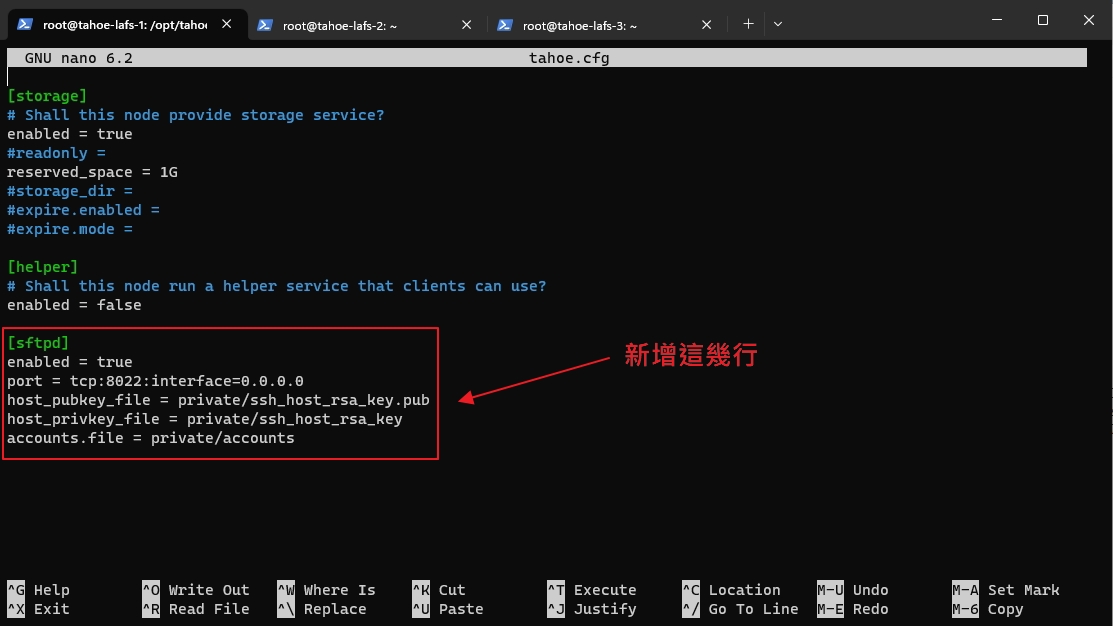
#編輯 tahoe.cfg
nano tahoe.cfg

#將以下幾行新增至 tahoe.cfg 最後面
[sftpd]
enabled = true
port = tcp:8022:interface=0.0.0.0
host_pubkey_file = private/ssh_host_rsa_key.pub
host_privkey_file = private/ssh_host_rsa_key
accounts.file = private/accounts
21. 啟動第一台伺服器上的 Gateway
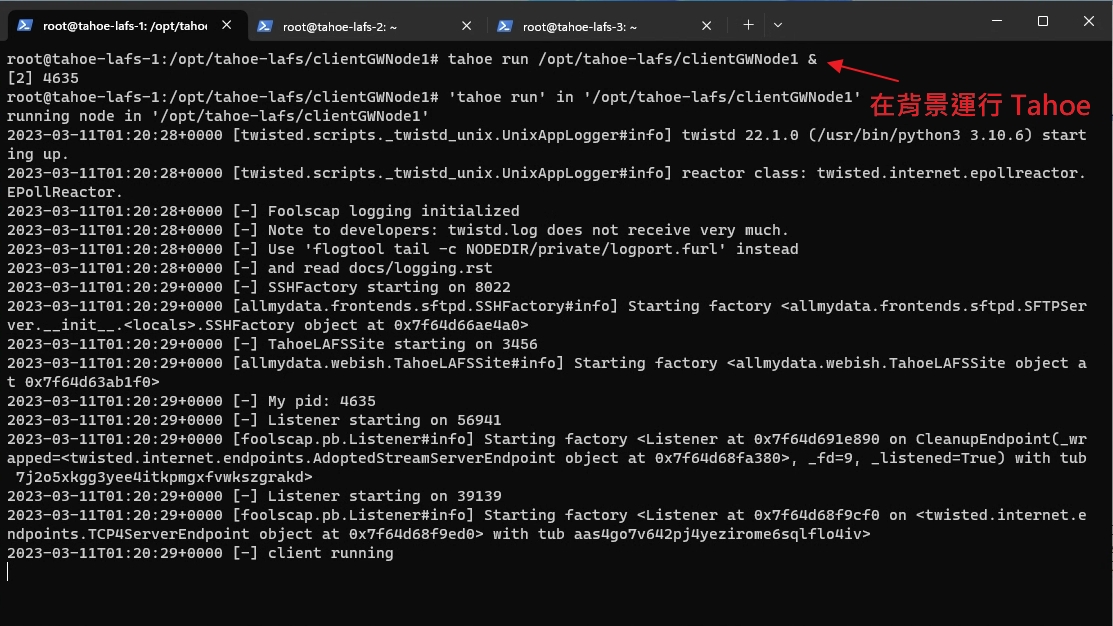
#啟動第一台伺服器上的 Gateway
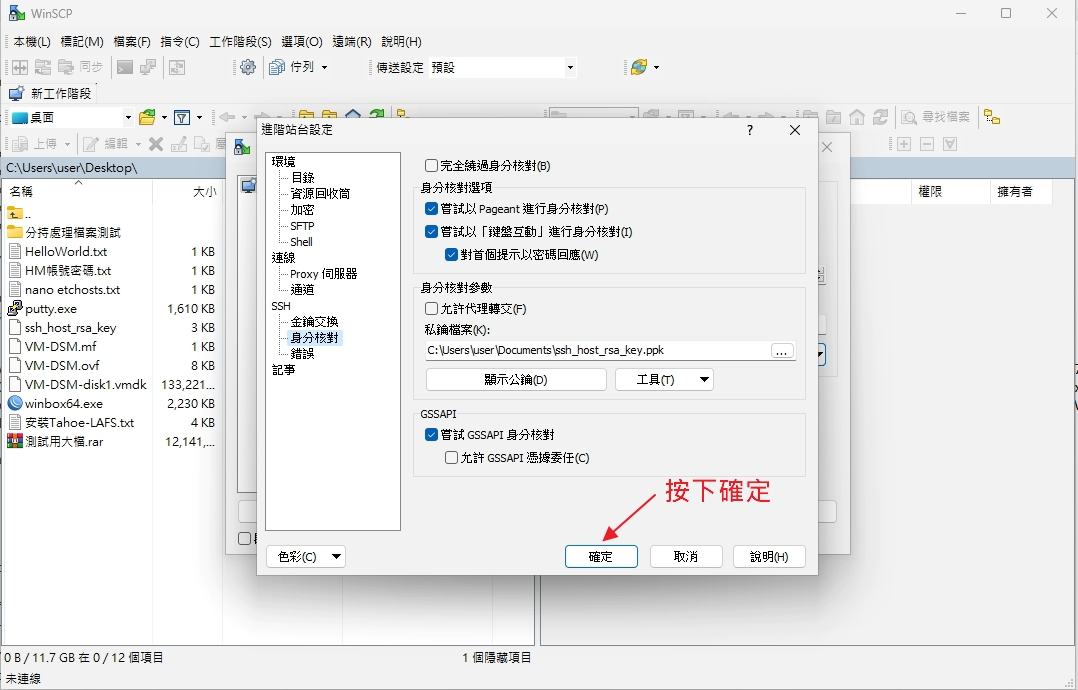
tahoe run /opt/tahoe-lafs/clientGWNode1 &22. 透過 WinSCP 將私鑰匯出
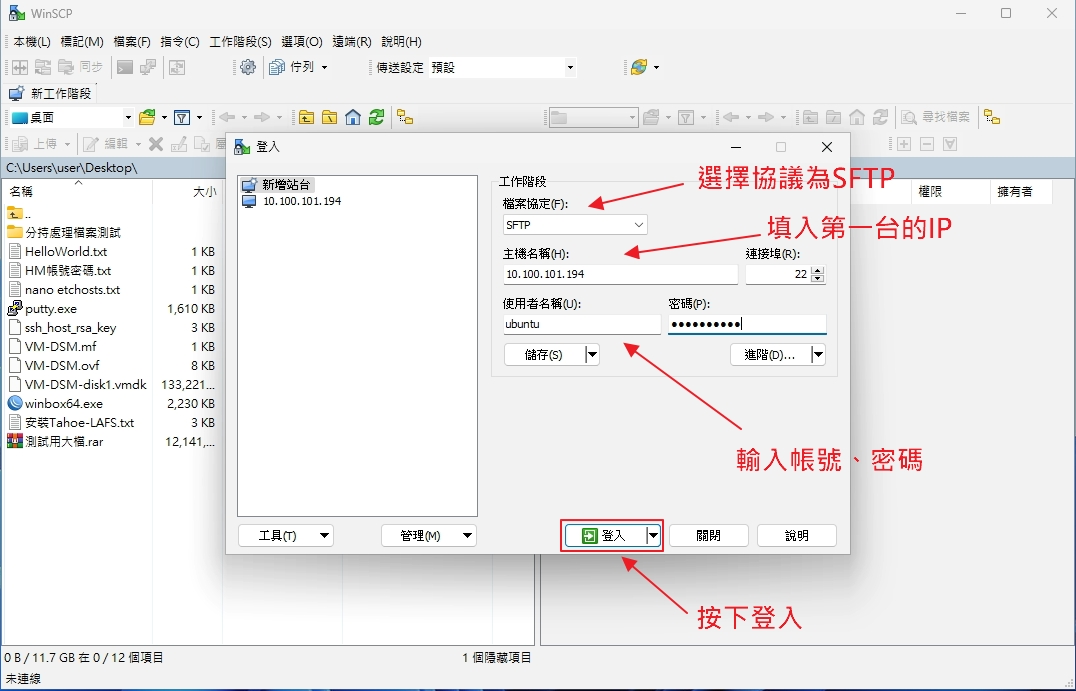
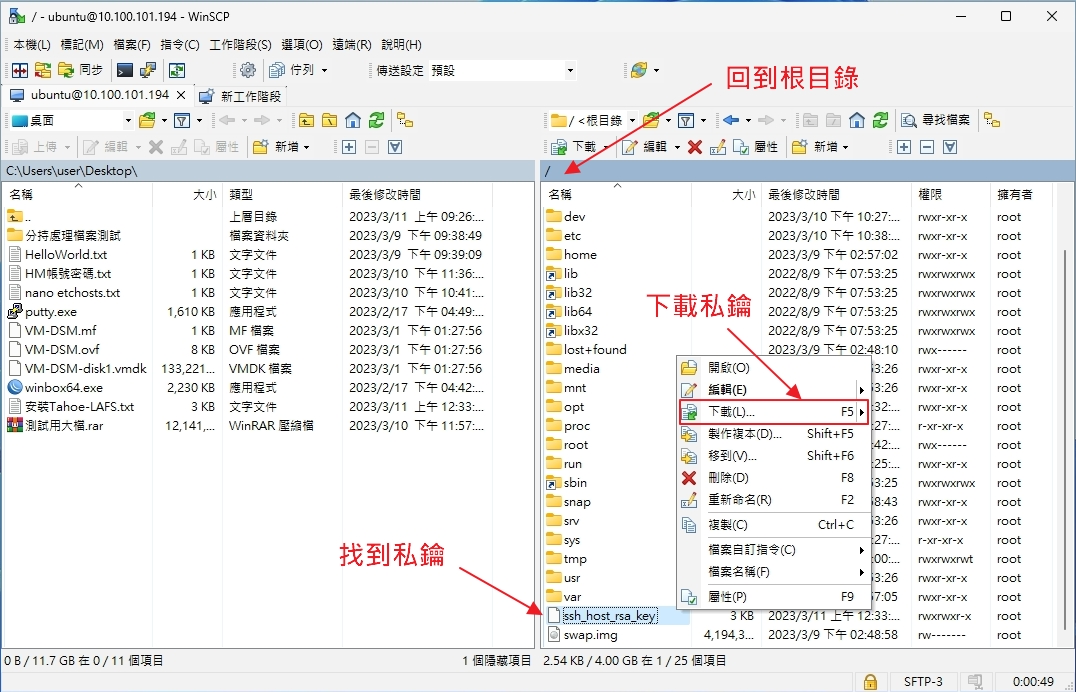
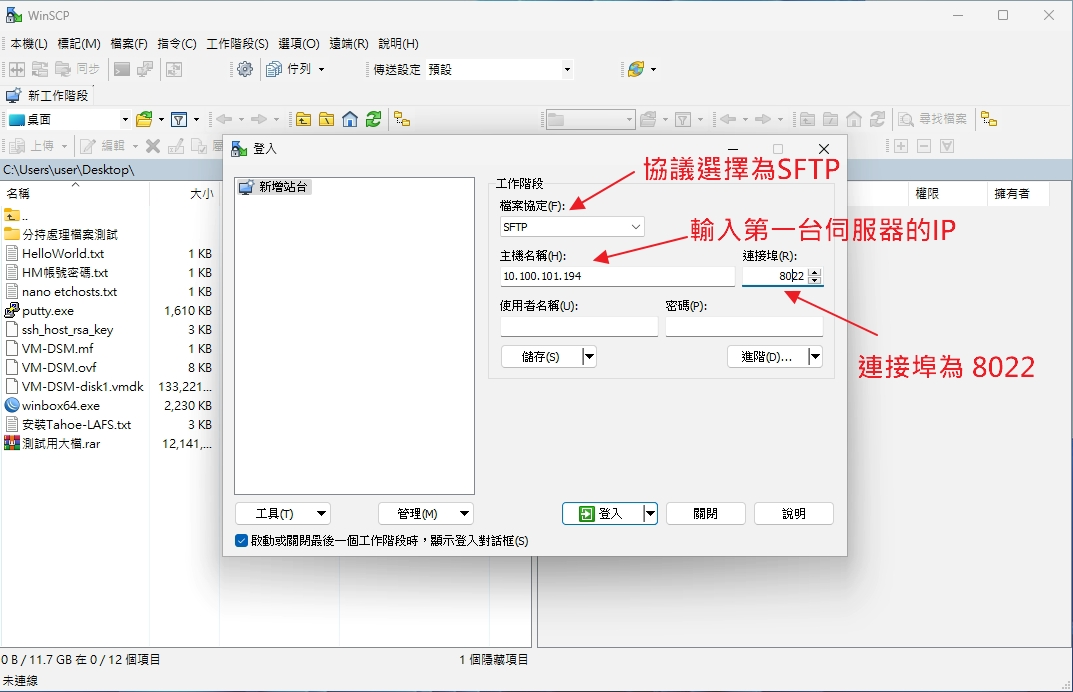
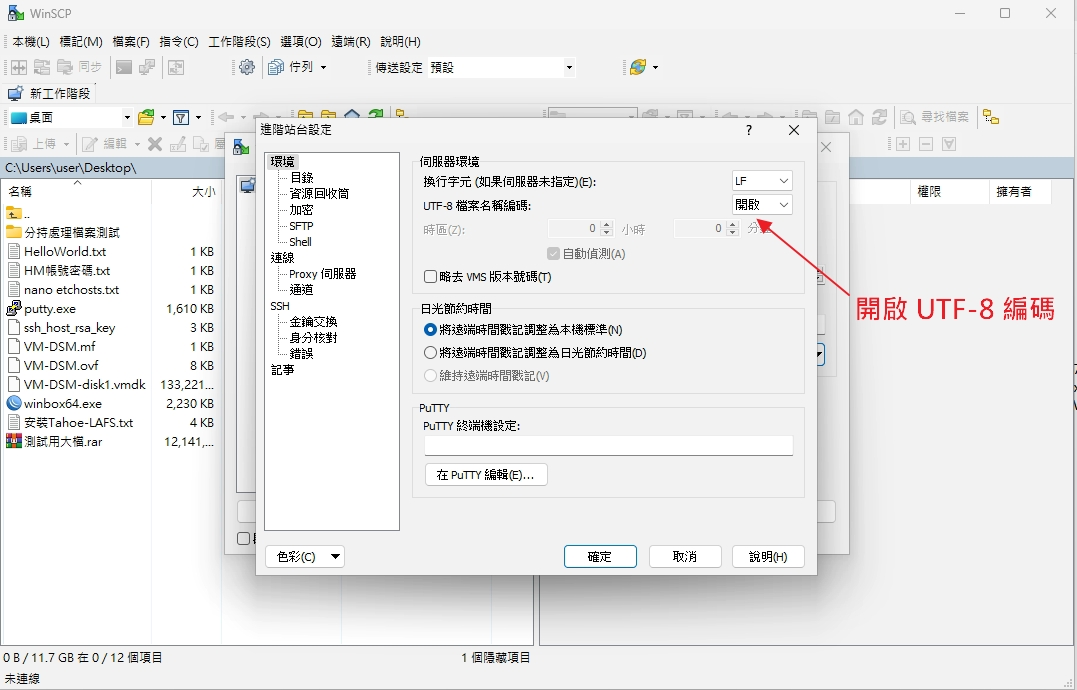
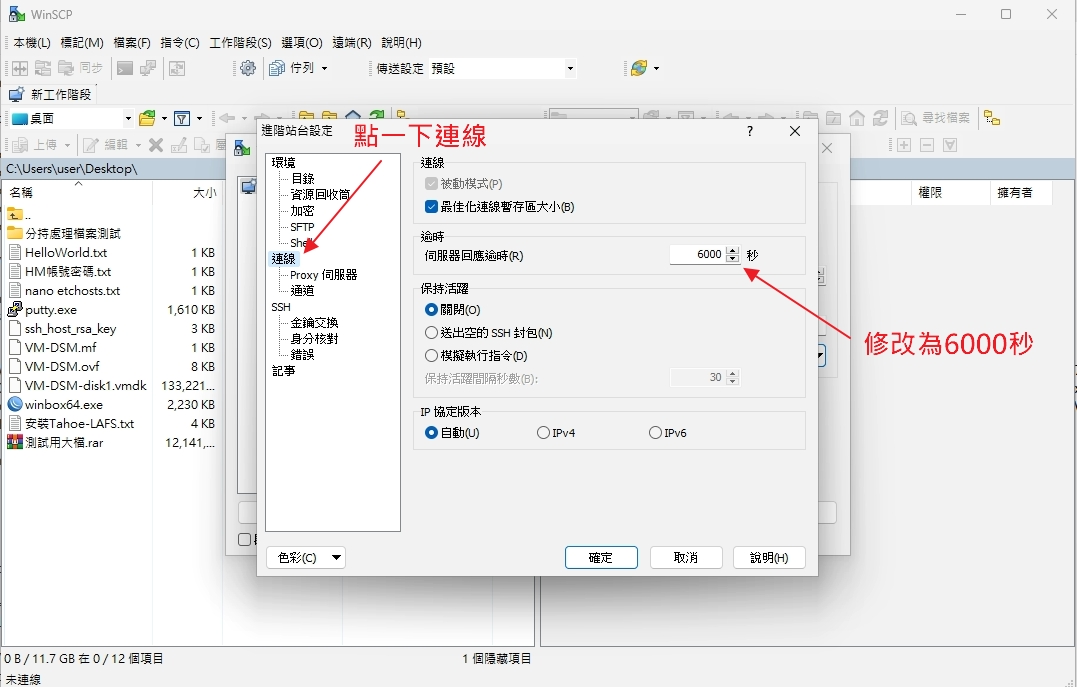
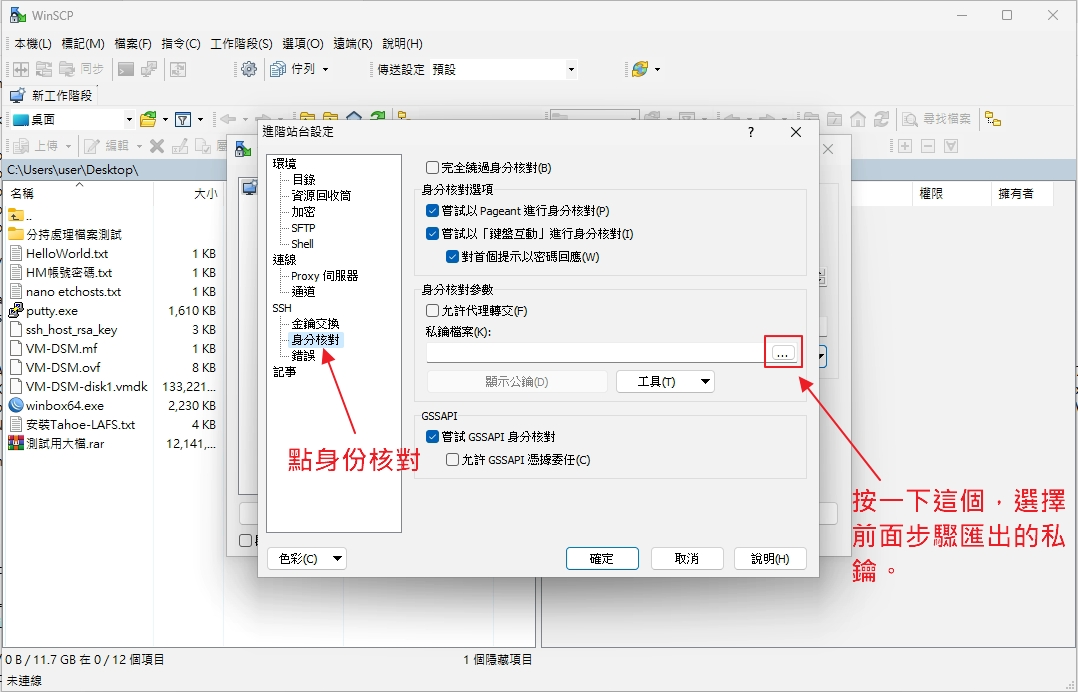
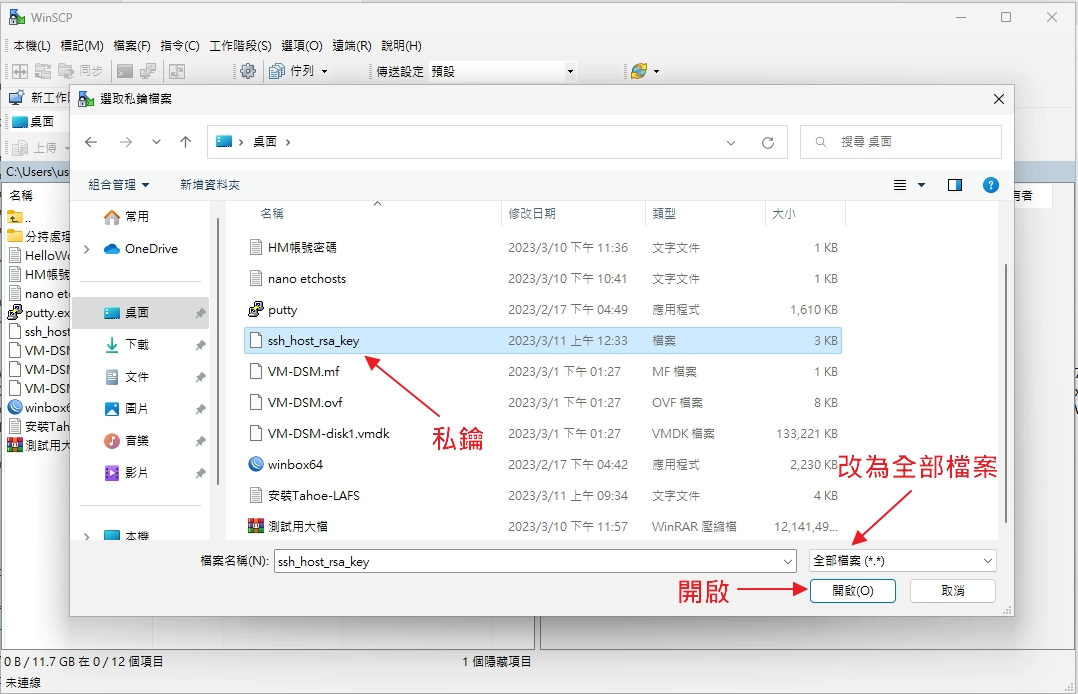
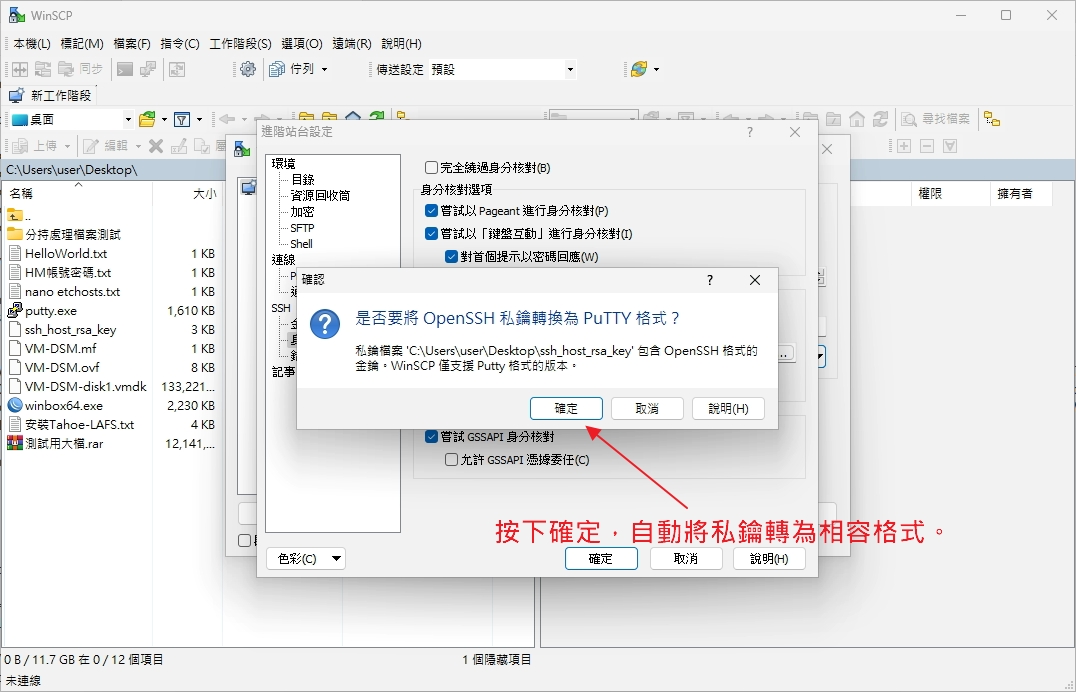
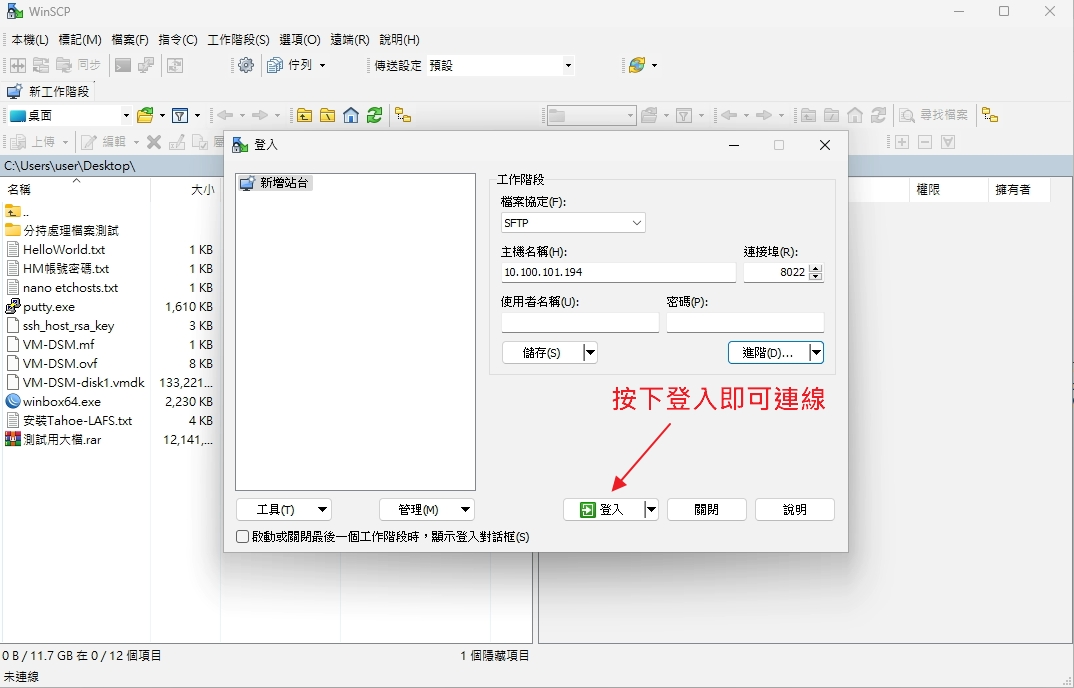
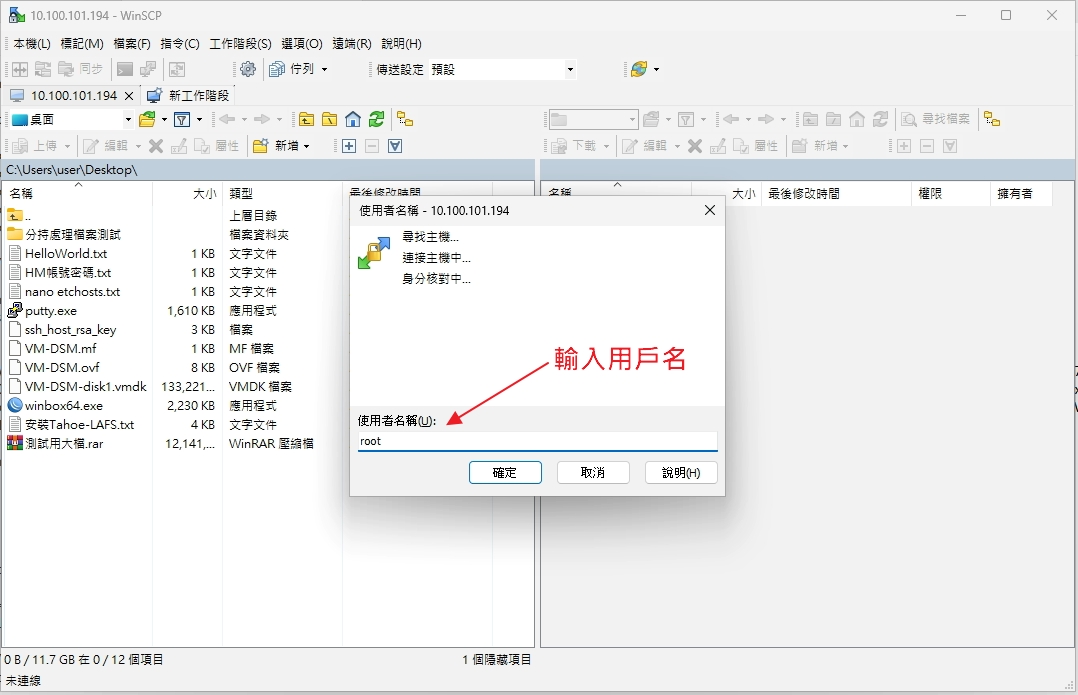
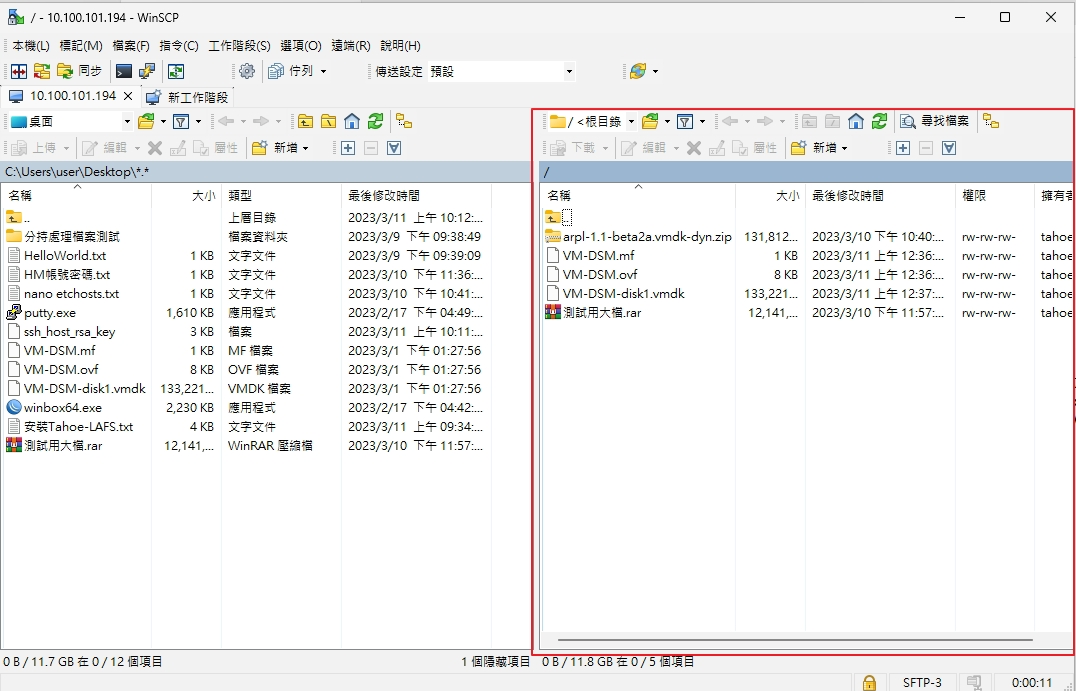
23. WinSCP 開啟新工作階段,連線Tahoe-LASF SFTP。

24. 設定Tahoe-LAFS開機自動啟動
#編輯 tahoe-introducer.service
nano /etc/systemd/system/tahoe-introducer.service

#填入以下內容並儲存離開
[Unit]
Description=Tahoe-LAFS autostart introducer
After=network.target

[Service]
Type=simple
User=root
WorkingDirectory=/opt/tahoe-lafs/intro-test/
ExecStart=tahoe run /opt/tahoe-lafs/intro-test/ --logfile=logs/introducer.log
[Install]
WantedBy=multi-user.target


#開機自動啟動服務
systemctl enable tahoe-introducer.service

#查看服務狀態
systemctl status tahoe-introducer.service
#編輯 tahoe-gateway.service
nano /etc/systemd/system/tahoe-gateway.service
#填入以下內容並儲存離開
[Unit]
Description=Tahoe-LAFS Storage Node1
After=network.target
[Service]
Type=simple
User=root
WorkingDirectory=/opt/tahoe-lafs/clientGWNode1
ExecStart=tahoe run /opt/tahoe-lafs/clientGWNode1 --logfile=logs/introducer.log
[Install]
WantedBy=multi-user.target
#開機自動啟動服務
systemctl enable tahoe-gateway.service
#查看服務狀態
systemctl status tahoe-gateway.service#Node2 Tahoe Storage 自動啟動
#編輯 tahoe-gateway.service
nano /etc/systemd/system/tahoe-storage.service
#填入以下內容並儲存離開
[Unit]
Description=Tahoe-LAFS Storage Node2
After=network.target
[Service]
Type=simple
User=root
WorkingDirectory=/opt/tahoe-lafs/Node2
ExecStart=tahoe run /opt/tahoe-lafs/Node2 --logfile=logs/introducer.log
[Install]
WantedBy=multi-user.target
#開機自動啟動服務
systemctl enable tahoe-storage.service
#查看服務狀態
systemctl status tahoe-storage.service#Node3 Tahoe Storage 自動啟動
#編輯 tahoe-gateway.service
nano /etc/systemd/system/tahoe-storage.service
#填入以下內容並儲存離開
[Unit]
Description=Tahoe-LAFS Storage Node3
After=network.target
[Service]
Type=simple
User=root
WorkingDirectory=/opt/tahoe-lafs/Node3
ExecStart=tahoe run /opt/tahoe-lafs/Node3 --logfile=logs/introducer.log
[Install]
WantedBy=multi-user.target
#開機自動啟動服務
systemctl enable tahoe-storage.service
#查看服務狀態
systemctl status tahoe-storage.service